LP2
LESSON PLAN prepared
by: Phil Fournier
The TYPE of lesson, TITLE of
lesson and ESTIMATED TIME:
Short DEMONSTRATION & DIRECTED DISCOVERY
on "Effective use of the Phil’s probe to pierce an electrical wire."
(6 minutes total time).
The STUDENT
PERFORMANCE Objective - (BEOLSWBAT):
Condition: Given a Phil’s probe and a sample piece of
wire
Person: each student...
Performance: will open the probe and insert the wire, piercing the
insulation with the needles
Criteria: successfully, without breaking the probe.
The EQUIPMENT
and MATERIALS required for the lesson:
·
HANDOUT
- showing the step-by-step use of the probe.
·
Phil’s
piercing probe.
·
Sample
piece of wire.
How INSTRUCTOR
will FACILITATE student learning:
·
Introduction
- Anticipatory Set (60
seconds)
* Statement of objective (from above) - BEOLSWBAT
(By End Of Lesson Students Will Be Able To ... )
·
Instructor
shows wire inserted in the piercing probe.
·
Tie in
the importance of using step-by-step dexterity of hand to open probe without
damaging it, and close it without undue force.
Instruction
- Key Concepts (120
seconds)
* Demonstrate each step on the handout (see attached handout).
Checking
for Understanding and Clarification
(30 seconds)
* Ask individual students questions about particular steps.
Guided
and Independent Practice
(30 seconds)
* Individual student will be directed through step-by-step process.
* Actual student practice will come after the demonstration.
Conclusion
- Closure (30 seconds)
* Reemphasize importance of the step-by-step process.
* Encourage students to use handout as a guide.
Handout to
accompany LP2 lesson, demonstration and guided practice
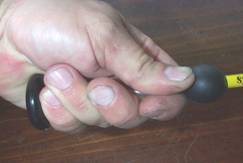
Step 1:
Grasp the Phil’s probe with the thumb pressing on the smaller ball and the back
of the hand (little finger) pressing against the upper knob. (See illustration
below).
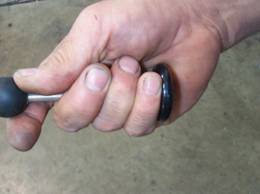
Step 2:
Push gently down on the ball with the thumb, observing the upper movement of
the brass shaft and needles to a point above the slot, allowing for insertion
of the wire.
Step 3:
Insert the wire in the slot opened up in the probe.
Step 4:
Allow the probe to close gently on the wire.
Step 5:
Move palm of right hand to upper knob.
Step 6:
Grasp lower knob with left hand.
Step 7:
Very gently push down on upper knob.
Step 8:
Take measurement from wire (hypothetical-we will not be doing this step in
class).